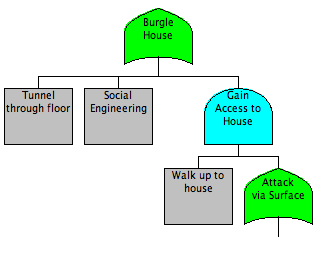
Define Attacker's Goal
First, we define the attacker's main goal - to gain access into the house. In a more meaningful example, this may be to steal information from a computer system or to destroy a gas pipeline.
Decompose Main Goal
Continue Refining Model
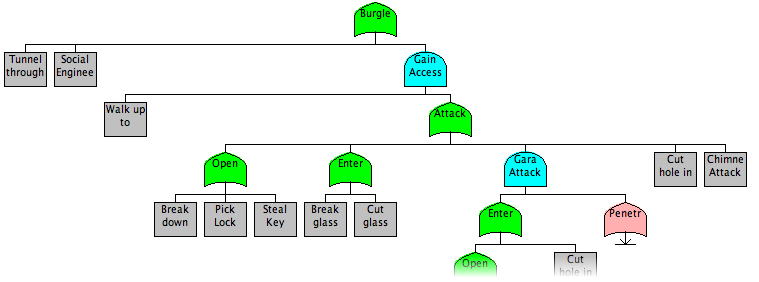
We continue to refine our model, decomposing each node into ever more specific sub-goals. Ultimately, the goals become descriptions of tasks the attacker needs to accomplish. A good rule of thumb is to continue breaking down attacks until it is clear to a non-expert how to perform the attack.
Start Analysis
Once the model is complete, we can begin to perform analysis. For this particular case, we will analyze the scenario of a Homeowner vs. a Juvenile Delinquent.
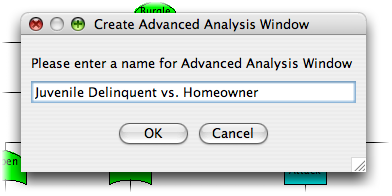
Start by clicking on the Analyze menu, then selecting Advanced Analysis. Enter the name of this analysis (in this case, "Juvenile Delinquent vs. Homeowner"). Hit OK to go to the utility function definition window.
Define Utility Functions
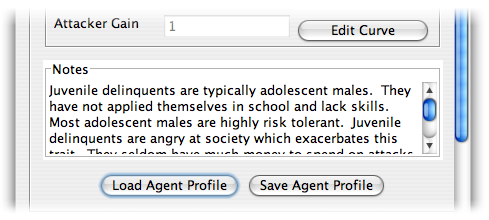
This window allows you to define the resource affinity curves for the adversary which we are modeling. For this example, we will load the files included with the Burgle House demo. Within the Agent Profile box, click the Load Agent Profile button, then select the Juvenile Delinquent.agt file.
Next do the same for Victim Profile, selecting Homeowner.vip.
Take some time to look at the mappings and read the notes to get an idea of why the curves were defined as they are. Once you are finished, click OK to proceed to the analysis window.
Find Riskiest Attacks
A good way to quickly check the risk of a particular adversary is to look at the Risk Metric column and find the attack with the highest value. This is the attack which has the highest risk for the defender: it is likely to happen and will hurt a lot when it does.
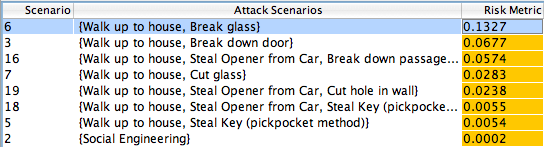
As you can see, in this case the most 'risky' attack is when the Juvenile delinquent walks up to the house and breaks the glass on a window.
If you look at the other columns, you can see why this is the case: it costs virtually nothing, takes very little skill, and has the potential for the attacker to gain quite a bit of money (all of the successful attacks against this hypothetical residence result in the attacker gaining about the same amount of money; therefore, the Ease of Attack metric is more important in this case for determining risk).
Modeling Countermeasures
Now that we have determined the most risky attacks against this house, we can consider what countermeasures should be implemented and how that will impact the decisions of the adversary. In this case, the homeowner decides to see what outcome will result by putting a fence around his property. To model this, we can use Alternative Sets, a feature in SecurITree which lets us keep multiple versions of the same tree while being able to change minor aspects of each.
To make a new Alternative Set, click Edit -> Define Alternative Sets. You can enter a name for the new set (in our case, this will be Fenced Perimiter), and then hit create.
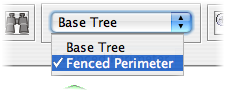
If you are following along with this demo using a copy of Burgle House, then you can switch alternative sets by clicking on the pulldown menu in the toolbar and selecting Fenced Perimeter.
Modeling Countermeasures (2)
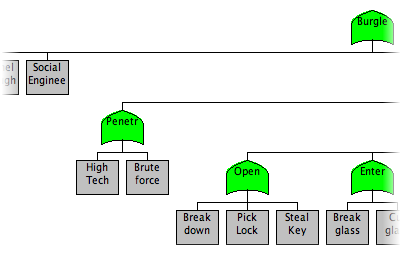
You can now see the difference between the Base Tree and the Fenced Perimeter: the leaf node "Walk up to House" in the Base Tree has been replaced by an OR node with two children, representing high tech and low tech attacks on the fence.
With no other changes to the tree, we will now repeat the advanced analysis, using the same profiles for both victim (the homeowner) and the attacker (the juvenile delinquent).
Viewing Risk after Countermeasures
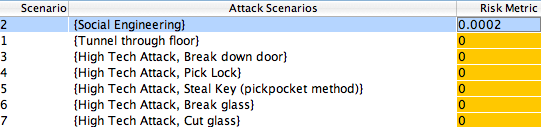
You can see that the lack of ability of the juvenile delinquent to penetrate the fenced perimeter has reduced the risk greatly - in fact, the only attack which is reasonable is a social engineering attack! In this case, the addition of a fence seems to be a very effective solution to reduce the risk of attack by a certain class of thieves.
But we are not finished yet - how would our defenses hold up against a more skilled attacker, like perhaps a cat burglar? This is your chance to apply the skills which you have learned in these tutorials to another real world problem.